This vegan chickpea pasta is all about turning what’s usually considered pantry filler into a creamy, satisfying sauce that feels indulgent but is made entirely from humble ingredients. I love how a can of chickpeas, some garlic, and a splash of lemon can come together into something so rich and comforting. It’s like a secret weapon for busy nights when I want flavor without fuss.
What really hooks me is how resourceful this dish is—no fancy ingredients, no dairy, just pure, honest flavors. It’s a reminder that some of the best meals come from what’s already in your cupboard. Plus, it’s a great way to stretch a can of chickpeas into a hearty, protein-packed pasta that doesn’t leave you feeling heavy or sluggish.
Focusing on transforming humble canned chickpeas into a creamy, satisfying pasta sauce that rivals traditional dairy-based versions, emphasizing resourcefulness and flavor depth.
Inspiration Behind the Dish
One evening, I opened a can of chickpeas after a long day and wondered if I could turn them into something more than just a snack or salad topping. I remembered how my grandma used to mash beans into simple, rustic sauces, and that nostalgia stuck with me. This dish is my twist on that idea—transforming pantry staples into a creamy, comforting pasta that feels like a little culinary secret. It’s proof that some of the best ideas come when you’re not overthinking, just improvising with what’s on hand.
Ingredient breakdown: key components
- Chickpeas: I prefer canned for convenience, but dried and cooked chickpeas give a nuttier flavor and firmer texture—just soak and simmer, then blend until silky.
- Garlic: Fresh is best for that pungent, aromatic punch. Crush and sauté until golden and fragrant—your kitchen will smell like a cozy restaurant.
- Lemon: Brightens everything with its acidity. Squeeze fresh lemon juice at the end to keep that zing lively and vibrant in the sauce.
- Olive Oil: A splash of good-quality olive oil adds richness and depth. Use extra virgin for the best fruity aroma that caresses the palate.
- Nutritional Yeast: It’s my go-to for cheesy undertones without dairy. Sprinkle toward the end to avoid clumping and keep that nutty, umami flavor sharp.
- Pasta: Look for chickpea pasta if you want extra protein and a slightly earthier bite. Regular pasta works fine, just cook al dente for a better bite.
- Salt & Pepper: Don’t underestimate their power. Season generously during cooking, then adjust at the end for that perfect, balanced flavor.
Spotlight on key ingredients
Chickpeas:
- I prefer canned for convenience, but dried and cooked chickpeas give a nuttier flavor and firmer texture—just soak and simmer, then blend until silky.
- Garlic: Fresh is best for that pungent, aromatic punch. Crush and sauté until golden and fragrant—your kitchen will smell like a cozy restaurant.
- Lemon: Brightens everything with its acidity. Squeeze fresh lemon juice at the end to keep that zing lively and vibrant in the sauce.
Olive Oil & Nutritional Yeast:
- Olive Oil: A splash of good-quality olive oil adds richness and depth. Use extra virgin for the best fruity aroma that caresses the palate.
- Nutritional Yeast: It’s my go-to for cheesy undertones without dairy. Sprinkle toward the end to avoid clumping and keep that nutty, umami flavor sharp.
Notes for ingredient swaps
- Dairy-Free: Swap out any cream or cheese with coconut milk or cashew cream for a rich, plant-based finish.
- Gluten-Free: Use gluten-free pasta made from rice, corn, or lentils—just watch the cooking time as it varies.
- Oil Alternatives: If you want to cut back, use a splash of vegetable broth or water instead of oil—less richness, more subtle flavor.
- Lemon Variations: Lime or vinegar can add acidity if lemons aren’t available, but the lemon-brightness is key, so don’t skip entirely.
- Herb Boost: Fresh basil or parsley brighten the dish. Dried herbs can work in a pinch, but add them early for full flavor release.
- Protein Add-ins: Toss in sautéed tofu cubes or roasted nuts for extra texture and protein, if chickpeas aren’t enough.
- Salt & Pepper: Sea salt or flaky sea salt adds a more nuanced flavor; pepper can be replaced with chili flakes for heat.
Equipment & Tools
- Large skillet: To sauté garlic and toss pasta with sauce
- Blender or immersion stick: To blend chickpeas into a smooth sauce
- Measuring cup: To measure liquids for blending and adjusting sauce
- Cooking spoon: To stir pasta and sauce during mixing
Step-by-step guide to chickpea pasta
- Gather your equipment: a large skillet, a blender or immersion stick, a measuring cup, and a spoon. Preheat the skillet over medium heat, around 160°C (320°F).
- Drain and rinse a can of chickpeas—reserve some of the liquid if you like, to adjust sauce consistency later. Toast a tablespoon of olive oil in the skillet until shimmering and fragrant, about 2 minutes.
- Add 3 cloves of minced garlic to the skillet. Sauté until golden and aromatic, about 1-2 minutes. Watch for a slightly nutty scent and a subtle sizzle.
- While garlic cooks, bring a pot of salted water to boil. Cook your pasta (preferably chickpea or regular, 8-10 minutes), until al dente. Drain and set aside.
- Transfer chickpeas to the blender. Add the sautéed garlic, a squeeze of lemon juice, a tablespoon of olive oil, and a splash of water or reserved chickpea liquid. Blend until smooth and creamy, about 30 seconds. If too thick, add more liquid until it reaches your desired consistency.
- Taste and adjust seasoning with salt, pepper, and more lemon if needed. Return the sauce to the skillet over low heat, just to warm it through, about 1 minute. It should be silky and well-integrated.
- Toss the cooked pasta directly into the skillet with the chickpea sauce. Mix well, letting the pasta absorb some of the sauce and flavors meld for 1-2 minutes. The sauce should cling nicely, and the pasta will be glossy and coated.
- Plate immediately. Garnish with fresh herbs or a sprinkle of nutritional yeast if desired. Rest for 1-2 minutes before serving to let the flavors settle.
Serve immediately, garnished as desired. Toss gently for an even coating. Let rest for 1-2 minutes to allow flavors to settle before enjoying.
How to Know It’s Done
- The sauce is smooth, creamy, and coats the pasta evenly.
- A quick taste reveals a bright, savory flavor with a hint of lemon and garlic.
- The pasta is al dente, with a slight bite, not mushy or undercooked.
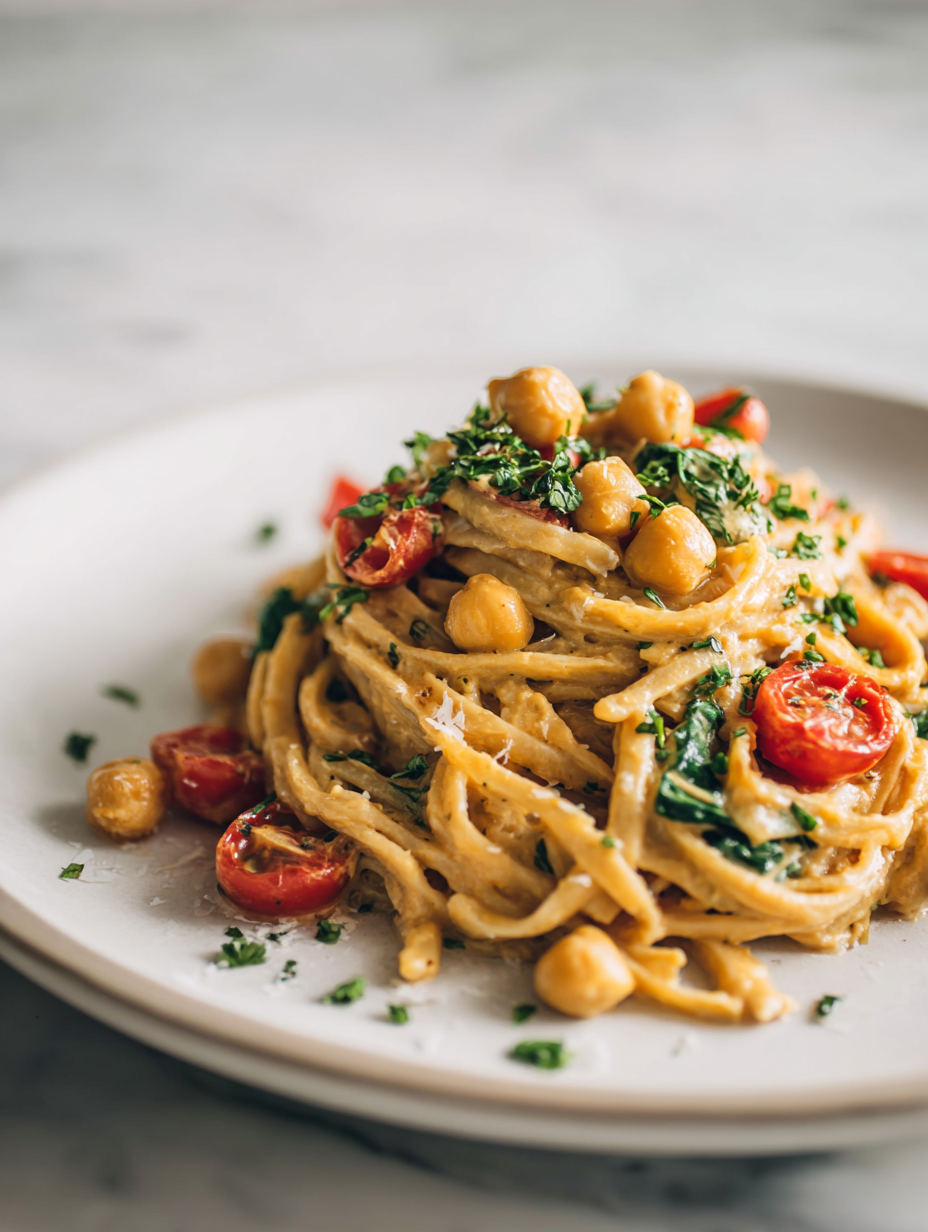
Creamy Vegan Chickpea Pasta
Ingredients
Equipment
Method
- Bring a large pot of salted water to a boil, then cook your pasta until al dente, about 8-10 minutes. Drain and set aside.
- While the pasta cooks, heat a tablespoon of olive oil in a large skillet over medium heat. Add the minced garlic and sauté for 1-2 minutes until fragrant and golden, filling your kitchen with a warm, nutty aroma.
- Transfer the drained chickpeas to your blender. Squeeze in the juice of a fresh lemon and pour in the sautéed garlic along with the olive oil. Blend until smooth and creamy, adding a splash of water or reserved pasta water if needed to reach a silky consistency.
- Taste the sauce and season with salt, pepper, and optional nutritional yeast. Blend briefly again to incorporate the seasonings evenly.
- Pour the chickpea sauce back into the skillet and warm over low heat for about 1 minute, stirring gently until heated through and silky.
- Add the cooked pasta directly into the skillet with the sauce. Toss carefully to coat each strand evenly, allowing the flavors to meld for 1-2 minutes. The sauce should cling nicely, creating a glossy, creamy appearance.
- Serve immediately, garnished with fresh herbs or extra lemon if desired. Enjoy the vibrant, creamy texture and hearty flavor of this simple, pantry-inspired dish.
Pro tips for perfect chickpea pasta
- Sauté garlic carefully: Watch for a golden hue and fragrant aroma—avoid burning to prevent bitterness.
- Blend chickpeas smoothly: Start on low speed, then increase to high until silky—add liquid gradually if needed.
- Taste and adjust: Always sample the sauce before serving; balance lemon, salt, and pepper for optimal flavor.
- Cook pasta al dente: Slightly firm bite ensures the sauce clings better and prevents mushiness.
- Reserve pasta water: Use it to adjust sauce consistency—starchy water adds body and richness.
- Garnish thoughtfully: Fresh herbs or a sprinkle of nutritional yeast at the end lift the dish with aroma and flavor.
- Serve immediately: The sauce thickens as it cools—plate while warm for the best texture and taste.
Common mistakes and how to fix them
- FORGOT to drain chickpeas → Rinse well to remove canning residue and excess salt.
- DUMPED oil in pan → Use moderate heat; oil should shimmer but not smoke.
- OVER-TOASTED garlic → Sauté until fragrant and golden, about 1-2 minutes; avoid bitter taste.
- SKIPPED seasoning adjustments → Taste and season gradually for balanced flavor.
Quick fixes and pantry swaps
- If sauce is too thick → Splash in hot water and stir until silky.
- When pasta clumps → Toss with a teaspoon of olive oil before storing.
- Splash lemon juice when sauce tastes flat for brightness.
- Patch overcooked chickpeas with extra blending or a splash of water.
- Shield from burning by lowering heat immediately if garlic starts to darken.
Prep, store, and reheat tips
- Prepare the chickpea sauce ahead by blending and seasoning; keep refrigerated for up to 2 days. The flavors deepen overnight, becoming more vibrant.
- Cook the pasta just until al dente, drain, then toss with a tiny drizzle of oil to prevent sticking. Store in an airtight container for up to 3 days in the fridge.
- Reheat gently in a skillet over low heat, stirring often. Add a splash of water or reserved pasta water to loosen the sauce and revive its creamy texture.
- For longer storage, freeze the sauce in small portions for up to 1 month. Thaw overnight in the fridge, then reheat as described. The texture may be slightly softer, but the flavor remains bright.
- Reheated pasta may lose some of its original gloss; toss with a fresh squeeze of lemon or a drizzle of olive oil to brighten it up again. The aroma of garlic and lemon should still be lively.
Top questions about chickpea pasta
1. Can I use dried chickpeas instead of canned?
Use canned chickpeas for convenience and a creamy texture, but dried chickpeas soaked and cooked can add a nuttier flavor and firmer bite if you prefer from scratch.
2. Can I blend dried chickpeas for the sauce?
Yes, blending chickpeas creates a silky, protein-rich sauce. Make sure to blend until completely smooth for the best creaminess.
3. When should I add lemon juice?
Adding lemon juice at the end brightens the sauce with a fresh, zesty pop that balances the earthiness of chickpeas.
4. How much garlic should I use?
Use garlic liberally—about 3 cloves—to develop a fragrant, savory base. Sauté until golden to release full flavor.
5. How al dente should the pasta be?
Cook the pasta until just al dente—firm to the bite—so it absorbs the sauce better and doesn’t turn mushy.
6. What if the sauce is too thick?
If the sauce is too thick, stir in a bit of reserved pasta water or warm water until it reaches your preferred consistency.
7. When should I add nutritional yeast?
Stir in nutritional yeast at the end for cheesy, umami notes that boost flavor without dairy.
8. How do I reheat the pasta without losing creaminess?
Reheat leftovers gently in a skillet with a splash of water or oil, stirring often to maintain creaminess and flavor.
9. Can I use gluten-free pasta?
You can substitute with gluten-free pasta made from rice, lentils, or corn—just cook according to package instructions.
10. Can I add other proteins?
If you want extra protein, toss in sautéed tofu cubes or toasted nuts before serving for added texture and nutrients.
This dish feels like a little rebellion—turning pantry staples into something surprisingly rich and satisfying. It’s a reminder that simplicity and a bit of resourcefulness can still deliver real comfort.
Plus, it’s perfect for busy nights or when you want a hearty, plant-based meal without much fuss. Sometimes, the simplest ingredients make the most memorable meals, especially when you’re not overthinking it.

Hi, I’m Lily Ashworth – and if you’ve ever cried over a burnt grilled cheese or served cereal for dinner after a kitchen disaster, you’re in the right place. The phrase “say a little prayer for the burnt toast” became a family joke – something we’d mutter while scraping crumbs into the sink and laughing at yet another kitchen misadventure.