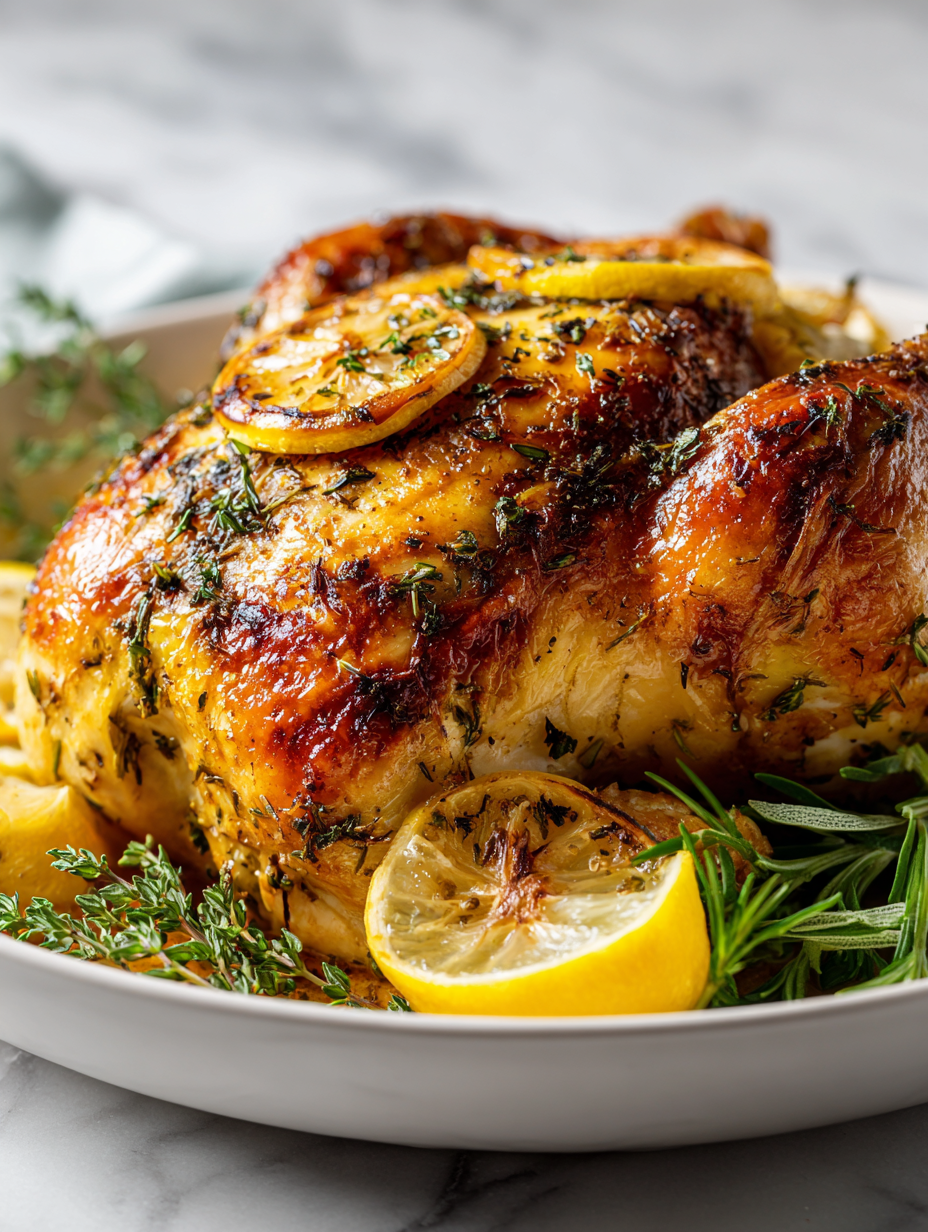
This roast chicken with lemon and herbs is my go-to for when I want something vibrant but uncomplicated. The lemon’s bright tang cuts through the richness of the bird, making it feel fresh and lively, even after hours in the oven. It’s a simple combo, but the way the citrus layers with the herbs really lifts the whole dish.
I love how this recipe invites you to play with flavors, balancing the savory, roasted chicken with that zesty pop of lemon. It’s perfect for a busy weeknight when you need something comforting but not heavy. Plus, the aroma filling the kitchen—garlic, herbs, and citrus—makes everyone come running.
Focusing on how the lemon’s brightness cuts through the richness of the roasted chicken, I aim to highlight the simple magic of balancing bold citrus notes with savory herbs, making this dish feel lively and refreshingly straightforward, perfect for brightening weeknight dinners or weekend gatherings.
Bright Citrus Meets Savory Herbs
- Nothing beats the smell of roasting chicken mingling with lemon zest—pure comfort wrapped in a bright aroma.
- There’s a chaotic joy in squeezing fresh lemon over the hot bird just before serving; it’s like a flavor burst in your mouth.
- I remember the first time I nailed this recipe—felt like I unlocked a secret to making weeknight dinners special.
- This dish reminds me of family Sunday dinners, where the simple, honest flavors create the best memories.
- Sometimes I add a splash of white wine before roasting—brings out a subtle, smoky depth that lingers on the palate.
The inspiration behind this dish
- This recipe was born out of a quiet Sunday afternoon, when I opened my fridge and found a lonely lemon and a sprig of thyme. I wanted something simple but vibrant, a dish that felt like a little celebration of fresh flavors. Roasting the chicken with lemon and herbs became my go-to for those times I craved comfort with a bright twist.
- It’s become a little ritual—squeezing that first burst of lemon over the crispy skin, watching the herbs release their aroma as it roasts. I love how the citrus cuts through the richness, making every bite feel lively, even after hours in the oven. It’s honest, straightforward, and somehow always feels special.
- heading
- story_type
Contextual origin, trivia, or history
- Historically, roasting poultry with citrus dates back to Mediterranean cuisines, where lemons were a staple ingredient for flavor and preservation.
- Lemon and herbs became a classic duo because the acidity helps tenderize the meat while infusing it with bright, fresh notes.
- In medieval Europe, herbs like thyme and rosemary were believed to have medicinal properties, often used in roasted dishes for health benefits.
- The use of lemon in roasted chicken gained popularity in coastal regions, where fresh citrus was abundant and added a lively contrast to rich meats.
Key ingredients and tips
- Chicken: I use a whole bird, skin-on for that crispy exterior; you can swap with thighs if you prefer juicier, more forgiving meat.
- Lemon: Bright, zesty, and essential. I love using fresh lemons for their juiciness, but bottled lemon juice is a decent shortcut if fresh isn’t available.
- Herbs: Fresh thyme and rosemary give a fragrant, earthy note. Dried herbs work, but they won’t offer the same vibrant aroma or punch.
- Garlic: Roasted garlic becomes mellow and sweet, but raw garlic can add a pungent punch if you prefer a sharper flavor—just add it later.
- Olive oil: I prefer a good extra virgin for richness and depth, but a neutral oil like canola works if you want a lighter finish.
- Salt & pepper: The foundation—don’t skimp. I season generously before roasting to draw out flavor and help crisp the skin.
- Optional: A splash of white wine or chicken broth in the pan adds moisture and a subtle, smoky complexity—try it if you’re feeling adventurous.
Spotlight on key ingredients
Lemon:
- I love how the lemon’s bright, tangy aroma fills the kitchen as it roasts. The acidity tenderizes the meat and adds a zesty punch to each bite.
- Herbs: Fresh thyme and rosemary release a fragrant, earthy aroma that intensifies as the chicken roasts. Their oils create a savory, herby crust that’s hard to beat.
Herbs:
- Chicken: I prefer a whole, skin-on bird for crispy, flavorful skin and juicy meat. The natural juices help keep the inside tender and moist during roasting.
- Herbs (again): Their volatile oils burst out when heated, turning the kitchen fragrant and making the meat taste layered and vibrant.
Notes for ingredient swaps
- Chicken: For a leaner option, turkey breast works, but it won’t be as moist or flavorful. Alternatively, use a whole Cornish hen for a smaller, equally charming roast.
- Lemon: If fresh lemons aren’t available, bottled lemon juice can work in a pinch, but it lacks the zest and bright aroma—use about half as much.
- Herbs: Fresh thyme and rosemary really shine, but dried herbs can be substituted—use about a third of the amount and add earlier in the roasting process for better flavor infusion.
- Garlic: Roasted garlic is mellow and sweet, but if you crave a sharper punch, add raw minced garlic toward the end of cooking or serve raw on the side.
- Olive oil: Extra virgin olive oil gives a rich, fruity flavor, but you can swap with a neutral oil like grapeseed or canola if you prefer a lighter finish.
- Salt & pepper: Kosher salt and freshly ground black pepper are best, but seasoned salt or flavored pepper blends can add a different kick—adjust quantity to taste.
- Additional flavor: A splash of white wine or chicken broth in the pan can add moisture and a subtle smoky note—if you want a deeper flavor, try a dash of balsamic vinegar instead.
Equipment & Tools
- Roasting pan or large ovenproof skillet: Supports the chicken during roasting and helps with even heat distribution.
- Kitchen twine: Keeps the legs tied for even cooking and presentation.
- Sharp chef’s knife: For slicing and carving the cooked chicken.
- Meat thermometer: Checks internal temperature for perfect doneness.
- Basting brush or spoon: For applying pan juices and lemon juice during roasting.
Step-by-step roast chicken guide
- Preheat your oven to 220°C (425°F). Find a sturdy roasting pan or large ovenproof skillet. Pat the chicken dry with paper towels—this helps get crispy skin. Season generously inside and out with salt and pepper.
- Stuff the cavity with half of the lemon slices, a few sprigs of thyme, and rosemary. Tie the legs with kitchen twine for even cooking. Rub the outside with olive oil, then sprinkle more salt, pepper, and minced garlic all over.
- Place the chicken breast-side up in your pan. Roast uncovered for 20 minutes, then turn the oven down to 180°C (350°F). Continue roasting for about 50-60 minutes, or until the skin is golden and crispy.
- Halfway through, baste the chicken with pan juices. Squeeze the juice of the remaining lemon over the chicken about 10 minutes before it’s done. It’ll add a bright, zesty glaze.
- Check the skin—should be deeply golden with crackling edges. The juices should run clear when pierced at the thigh, and the internal temp should be around 75°C (165°F). If it’s not quite there, cover loosely with foil and roast a little longer.
- Remove the chicken from the oven. Let it rest for at least 10 minutes. Resting helps the juices redistribute, keeping the meat moist and tender. Slice and serve with extra lemon slices and fresh herbs.
Let the chicken rest on a carving board covered loosely with foil for at least 10 minutes. Carve with a sharp knife, arrange on a platter, and serve with lemon wedges and herbs. Drizzle with pan juices for extra flavor.
How to Know It’s Done
- Skin is deeply golden and crispy, with no raw patches.
- Juices run clear when pierced in the thickest part of the thigh.
- Internal temperature reads 75°C (165°F) for safety and juiciness.
Lemon Herb Roast Chicken
Ingredients
Equipment
Method
- Preheat your oven to 220°C (425°F). Pat the chicken dry with paper towels to ensure crispy skin.
- Rub the chicken all over with olive oil, then season generously with salt and pepper, both inside and out.
- Stuff the cavity with half of the lemon slices, a few sprigs of thyme and rosemary, and the minced garlic.
- Tie the legs together with kitchen twine to keep everything snug and even during roasting.
- Place the chicken breast-side up in your roasting pan. Roast uncovered for 20 minutes to get crispy skin.
- Reduce the oven temperature to 180°C (350°F) and continue roasting for about 50-60 minutes, basting occasionally with pan juices.
- Halfway through roasting, squeeze some of the remaining lemon juice over the chicken for a bright, zesty glaze, and add extra herbs if desired.
- Check the chicken’s internal temperature with a meat thermometer; it should read 75°C (165°F), and the skin should be deep golden and crispy.
- Remove the chicken from the oven and let it rest on a cutting board, loosely covered with foil, for at least 10 minutes to allow juices to redistribute.
- Squeeze fresh lemon over the rested chicken, carve, and serve with extra herbs and lemon slices for a vibrant, flavorful presentation.
Pro tips for perfect roast chicken
- Start with a hot oven to sear the skin—20 minutes at 220°C (425°F)—then lower the heat for even roasting.
- Dry the chicken thoroughly before seasoning—this helps achieve that crispy, crackling skin you crave.
- Squeeze fresh lemon juice over the chicken in the last 10 minutes—brightens and caramelizes beautifully.
- Use kitchen twine to tie the legs—ensures even cooking and a tidy presentation.
- Baste the chicken with pan juices halfway through roasting—keeps the meat moist and flavorful.
- Rest the chicken for at least 10 minutes after roasting—this redistributes juices and keeps it tender.
- Check for doneness with a meat thermometer—aim for an internal temp of 75°C (165°F) in the thickest part.
Common mistakes and how to fix them
- FORGOT to pat chicken dry → Results in less crispy skin; always dry thoroughly before seasoning.
- DUMPED lemon juice directly on chicken → Squeeze lemon over the chicken for even flavor distribution.
- OVER-TORCHED skin → Reduce oven temperature or tent with foil if skin browns too quickly.
- MISSED resting time → Rest chicken at least 10 minutes to keep juices inside.
Quick fixes and pantry swaps
- When skin isn’t crispy, splash a little vinegar in the pan and broil briefly.
- If lemon juice makes the skin tough, patch with a brush of oil and finish in the oven.
- Over-torched skin? Shield with foil and lower oven temp 5–10°C (10–15°F).
- Forgot to rest? DUMP the chicken back in a warm oven for 5 minutes to reabsorb juices.
- For a quick rescue, pan-fry sliced chicken skin-side down until crackling shimmers again.
Prep, store, and reheat tips
- Prep the chicken: Season and stuff the chicken with lemon and herbs a day ahead. Keep it covered in the fridge to let flavors meld and skin dry out for crispiness.
- Storage: Once roasted and cooled, store leftovers in an airtight container in the fridge for up to 3 days. Reheat gently to preserve moisture and aroma.
- Shelf life: The chicken stays good for 2-3 days in the fridge. For longer storage, freeze portions wrapped tightly in plastic wrap and foil—up to 2 months.
- Reheating: Warm in a low oven (around 150°C/300°F) covered with foil, just until heated through. Expect the skin to lose some crispness, but the flavors stay lively. A squeeze of fresh lemon before serving brightens it up.
Top questions about roast chicken with lemon and herbs
1. Can I use bottled lemon juice instead of fresh lemons?
Use fresh lemon for a brighter, more aromatic flavor that really cuts through the richness of the roast. Bottled lemon juice works in a pinch but lacks the zest and fresh punch.
2. How do I know when the chicken is fully cooked?
Roast the chicken until the skin is deeply golden and crispy, and the internal temperature hits 75°C (165°F). Juices should run clear when pierced, and the meat should be tender and moist.
3. Can I substitute whole chicken with parts?
Yes, you can use chicken thighs or breasts. Thighs stay juicier and are forgiving, but skin-on breasts work well for crispy skin. Adjust cooking time accordingly.
4. Should I marinate the chicken beforehand?
Season the chicken generously with salt, pepper, and herbs before roasting. Basting halfway helps keep the meat moist, and squeezing lemon at the end brightens the flavors.
5. Why do I need to rest the chicken after cooking?
Rest the chicken for at least 10 minutes after roasting. This allows the juices to redistribute, making the meat tender and juicy when carved.
6. What are the signs my chicken is ready?
Use a meat thermometer to check the internal temperature. Also look for golden, crispy skin and clear juices as signs of doneness.
7. Can I add other ingredients to the chicken?
For extra flavor, stuff the cavity with lemon slices and herbs. You can also add garlic or a splash of white wine for depth.
8. How should I roast the chicken for best results?
Roast at a high temperature initially (around 220°C/425°F) to crisp the skin, then lower to 180°C/350°F to finish cooking evenly.
9. How long can I store leftover roast chicken?
Leftovers can be stored in the fridge for 3 days, or frozen for up to 2 months. Reheat gently in the oven to keep the skin crispy.
10. What if the skin isn’t crispy after roasting?
If the skin isn’t crispy, splash a little vinegar in the pan and broil briefly. Cover exposed skin with foil if it starts to burn.
This dish isn’t just about the bright lemon and fragrant herbs; it’s about those moments when the kitchen fills with a warm, savory aroma that makes everyone pause. The crispy skin, the tender meat—simple, honest, and unpretentious. It’s a reminder that good, flavorful food is often the most straightforward.
Whether it’s a weeknight dinner or a weekend gathering, this roast chicken brings a sense of comfort and brightness that feels just right for right now. It’s a dish that’s easy to make but feels special every time, especially with the little touches of lemon and herbs that lift it all.

Hi, I’m Lily Ashworth – and if you’ve ever cried over a burnt grilled cheese or served cereal for dinner after a kitchen disaster, you’re in the right place. The phrase “say a little prayer for the burnt toast” became a family joke – something we’d mutter while scraping crumbs into the sink and laughing at yet another kitchen misadventure.